
Managed Print Service (MPS)
All active GU-Q students, faculty, staff, and affiliates are eligible to use the Managed Print Service (MPS) at Georgetown. GU-Q uses a print service called PaperCut, which allows you to print documents securely from your desktop or laptop computer, as well as from your iOS or Android mobile device.
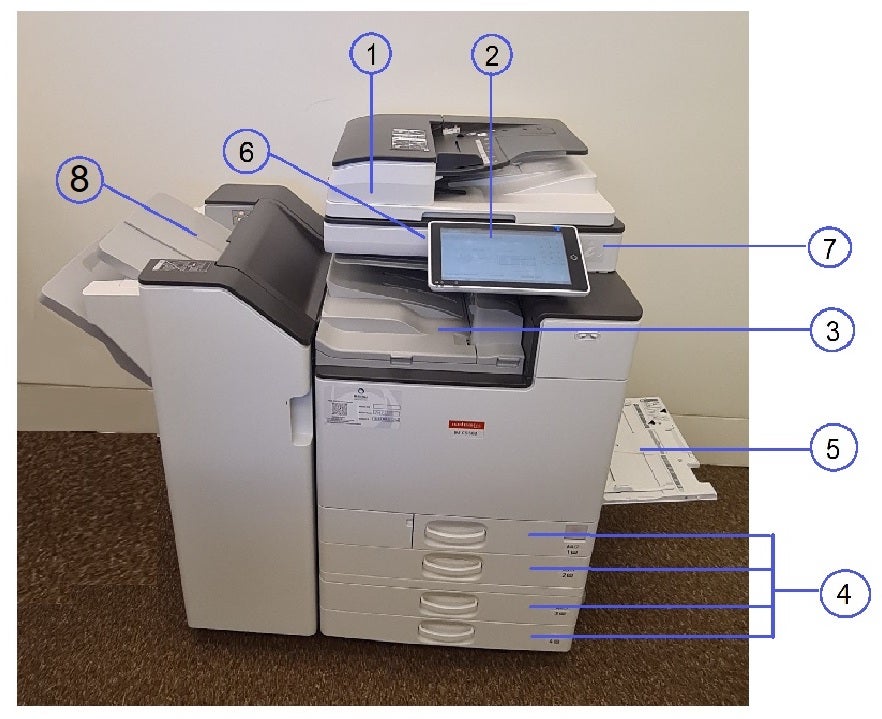
1. Exposure glass cover – Place originals facedown here.
2. Control Panel
3. Internal tray – Copied/printed paper is delivered here.
4. Paper trays 1, 2, 3, 4 – Load A4 & A3 paper here.
5. Bypass tray – Use the tray to copy or print on OCHP transparencies, adhesive labels, and paper that cannot be loaded in the paper trays.
6. Media slots – Insert an SD card or USB flash memory device.
7. NFC – Scan your ID card to log in to the printer.
8. Stapler module
GU-Q uses PaperCut as the managed print service software and multifunction Nashuatec printers. Printing a document using the managed print service involves a couple of steps:
First, you need to setup printers (print queues) on your devices.
Faculty and Staff GU-Q computers are setup with the printers (print queues) as their computers are issued by GU-Q IT.
Students and employees with personal devices, such as laptops and Smartphones need to be setup with the printers (print queues).
Second, you send your document to one of the print queues (GUQ-Print-BW and GUQ-Print-CL); the queues are the same across the university, and it’s where all print jobs will be stored.
Third, once you send your document to the print queue, you print (“release”) your document from any of the printers across the campus.
Note: You will have up to 24 hours to print your document after you send it to the queue; after this time period, your document will be removed from the queue. If your document is removed from the queue, just resend the document to the queue.
|
Printer Model |
Basement |
Fax |
| IMC 5500 | LG36 – Boss Office | |
| IMC 5500 | LA07 – FM supplies area | |
| IMC 5500 | LE09 – IT Support Office | |
|
Ground Floor |
||
| IMC 5500 | 0F29 – Dean’s Suite workroom |
Y |
| IMC 5500 | 0A36 – CIRS Office |
Y |
| IMC 5500 | 0F04 – Admission work area | |
| IMC 5500 | 0D48 – Faculty work area |
Y |
| IMC 5500 | 0D20 – Faculty work area | |
| IMC 5500 | 0D64 – Communication Office | |
| IMC 5500 | 0C21 – Library Red Square | |
| IMC 5500 | 0B06 – Library print station | |
| IMC 5500 | 0B22- Library work area | |
| IMC 5500 | 0A21 – Outreach Office | |
|
First Floor |
||
| IMC 5500 | 1C02 – Students lounge | |
| IMC 5500 | 1D73 – Finance work area |
Y |
| IMC 5500 | 1A33 – HR Office | |
| IMC 5500 | 1D49 – Faculty work area | |
| IMC 5500 | 1D21 – Faculty work area | |
| IMC 5500 | 1D12 – Academic Affairs files room | |
| IMC 5500 | 1A17 – EPS Office | |
| IMC 5500 | 1F07 – Student Affairs pantry | |
| IMC 5500 | 1G14 – Wellness resting room | |
| IMC 5500 | 1G39 – OAS workroom | |
| IMC 5500 | 1B24 – Library print station | |
|
Second Floor |
||
| IMC 5500 | 2D53 – Faculty print room | |
| IMC 5500 | 2D11 – Faculty print room | |
| IMC 5500 | 2B08 – Library computers room | |
| IMC 6000 | 2A23 – 2A24/25 corridor, close to IT Office |
Questions? Email IT User Support at guqhelpcenter@georgetown.edu
Student Printing
Click here to access printing information for students.
Faculty and Staff Printing
Click here to access printing information for faculty and staff.